There are a number of options available when it comes to setting up a new email account, but if you’re looking to set up an Apple iCloud email, you’ve come to the right place. Here’s a step-by-step of how to create and setup an iCloud email account on your iPhone, iPad, Mac and PC, as well as how to fix any problems and how to create an iCloud email alias.
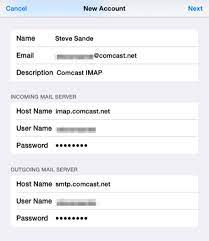
Good news is, you can access your iCloud email on Android. But the process is complex on Gmail — you need to add your iCloud account as IMAP, input incoming and outgoing SMTP server addresses, Port number, etc. All you get is the cluttered Gmail interface.
- If you have an Apple ID without an associated icloud.com address, you can add one (via iOS or macOS).
- If you have an icloud.com address already, you can add aliases (via iCloud.com).
- If you want a separate icloud.com address for email that isn’t an alias, you can create one by creating an Apple ID account (via macOS).
There are a number of options available when it comes to setting up a new email account, but if you’re looking to set up an Apple iCloud email, you’ve come to the right place.
Here’s a step-by-step of how to create and setup an iCloud email account on your iPhone, iPad, Mac and PC, as well as how to fix any problems and how to create an iCloud email alias.
iPhone, iPad, or iPod Touch: Tap Settings > your name > iCloud, toggle Mail to the On position, and follow the prompts.
Mac 10.15 and later: Select Apple menu > System Preferences > Apple ID > iCloud > Mail and follow the prompts.
Mac 10.14 and earlier: Select Apple menu > System Preferences > Mail, and then follow the prompts.

How To Create an iCloud Email Address on a PC
If you have a Windows PC but want to create an iCloud email account, you’re in luck. Windows PC users can easily set up an iCloud email even though they don’t have a Mac computer. However, you’ll first need to create an iCloud account on an Apple device such as an iPhone. You’ll also need to use a non-Apple email address. First, we’ll cover how to set up an account using an Apple device. Here’s how you do it:
- Launch the “Settings” app on an iPhone or iPad.
- Press on the “Profile photo.”
- Choose “iCloud” and toggle the switch next to it into the on position.
- A popup window will open. Click on “Create.”
- Type in the email address you want to use. Tap “Next.”
- To confirm this new email address hit “Done.”
How to Create iCloud Email on PC or Mac
- Click the Apple menu. It’s at the top-left corner of the screen.
- Click Internet accounts. It’s the blue circle with a white “@” in the third row of icons.
- Select Mail. It’s in the center column.[1]
- Click Get a free iCloud email address. Now you’ll see “icloud.com” next to the email address box.
- Answer the security questions and click Next. These questions are just to confirm your identity in case you forget your password.
- Agree to the iCloud terms. After reviewing the agreement, check the box next to “I have read and agree…” and then click Agree. Your new iCloud email address is now ready to use.
Create a new Apple ID to get an icloud.com address
- Click the lock icon in the lower-left corner and enter your administrative password.
- In Login Options, check “Show fast user switching menu.”
- Skip the step during the account completion process to use or create an Apple ID.
- Click Create Apple ID at the sign-in prompt.
- Click the text link “Get a free iCloud email address.”
- The Email Address field changes to an empty field and “@icloud.com”. You can now enter an address you want. (macOS will warn you if it’s not available.)
- Log out of this new account ( > Log Out [account name]).
- You can optionally disable fast-user switching.
How to set up iCloud on iPhone and iPad
- Click on the Apple icon in the upper left corner of the screen.
- Select System Preferences… from the drop-down menu.
- Choose Sign in at the top right.
- Enter your Apple ID and Password.
- Click Next.
- Choose Allow to allow Find My Mac in the popup.
- Confirm the checkboxes next to all the apps that use iCloud.